Chapter 5
Range of Motion
Your body is made up of a series of bones, muscles, and joints. The joints are bone junctions. The purpose of the joints is to provide motion within your body and to support or bear weight. Joints are surrounded by muscles, tendons, ligaments, and a joint capsule that provide stability to the joint. The muscles that cross a joint create movement of the bones on either side.
The range of motion (or number of degrees of motion) at a joint is determined by the tightness of the ligaments, tendons, muscles, and joint capsule surrounding that joint--the looser or more flexible the structures, the more movement. The tighter the structures, the less movement.
Prolonged tightness of a joint and the structures around it can lead to permanently shortened range of motion. This is called a contracture (con-TRACK-churr). The treatment for contractures includes static stretching (prolonged positioning and stretching on the muscles and joints) and heat treatments. Contracture may require extensive surgical procedures. Contractures are at the least disfiguring and cause other problems, such as pressure sores and loss of ability to perform physical activities. They significantly interfere with hygiene. The best plan is to avoid contractures. See the chapter on Nerves, Muscles & Bones.
Generally, the everyday movements of a person are enough to keep his or her joints and the muscles that cross them loose and flexible. The weakness caused by your spinal cord injury may interfere with the full range of motion of your joints. Because of this weakness and the resulting loss of movements, it is necessary to find some other means to stretch your muscles and to maintain the flexibility of the joints and surrounding structures.
Loss of motion will often show up in predictable patterns after a spiral cord injury. Sitting in a wheelchair shortens the muscles that cross the front of the hips and the back of the knees. If you are not sitting in a fully erect posture, you can also see tightness in the front of the shoulders and neck from a forward slouched posture. Blankets can also cause the toes to point downward while you are lying in bed, which can shorten the muscle at the back of the ankle.
It is important to stretch these muscles to counter the shortening caused by positioning or the tightness can become fixed (contracture) and limit your ability to move. Loss of motion affects you and your body in many ways. Tightness of your joints, whether it is in your hips, knees, or shoulders, often limits the positions into which you can move your body. This limits the activities you can do for yourself. In addition to positional shortening, use of a manual wheelchair promotes strengthening and tightness in the anterior muscles of the shoulder. This can lead to a rounded shoulder posture. Careful stretching of the anterior muscles and strengthening of the posterior muscles can improve the muscle balance around the shoulder.
Tightness of your trunk and legs may also affect your sitting or standing posture, especially when there is more tightness on one side of your body than the other. This can lead to a curving or twisting of your back and throw off the balance of your body. Decreased range of motion of your arms, legs, and trunk tends to increase pressure at localized points rather than allowing pressure to be evenly distributed. This localization of pressure significantly increases your risks of skin breakdown. Optimal seated posture is critical to maintaining healthy skin and pain-free shoulders.
Loss of motion in your hips can also interfere with the cleansing of your groin and especially interfere with positioning your legs during sex. Maintaining the flexibility of your muscles also tends to decrease spasticity.
Your physical and occupational therapists will instruct you in how to do your own range of motion exercises. A program will be designed specifically for you and your individual needs. If you are not able to do your own exercises by yourself, you will be taught how to instruct others to do the exercises for you. Remember, even if you are unable to do the exercises yourself, you are still responsible for your own body and what is done to it.
In some cases, especially with hands, your therapists may allow for a certain amount of tightening in some of the tendons of your hands and wrists. This selective shortening can sometimes increase the function of your hands through an action called tenodesis (ten-oh-DEE-siss).
As important as range of motion is, and it is very important, so is having time for things you enjoy. If you have a high cervical spinal cord injury, you may need assistance with many daily tasks. It is very important that you spend a realistic amount of time for range of motion exercises. Ask your therapist which exercises are the most critical for you. Ask your therapist how you can incorporate the exercises into dressing or bathing activities. It may also be possible to design a program with exercise that rotate each day so that you are spending a maximum of thirty minutes a day on range of motion.
On the other hand, if you have a low lumbar spinal cord injury, you have a different problem. Your muscles have no contractile element (no "pull back") so your problem is getting too loose. Ask your therapist to show you clear and specific stopping points for all motions of your legs.
Everyone with a spinal cord injury should pay special attention to not allowing the muscle in front of the hip (the hip flexor) to get tight. This is a big strong muscle and once tight makes for many positioning problems in bed, in a wheelchair, or standing. The best recommendation for this muscle is lying on your stomach (prone lying) at least twice a day. It is important to start this early after your SCI because once this muscle is tight, lying on your stomach will just arch your back and not really stretch the hip flexor.
SELF-STRETCHING
Self passive range-of-motion (PROM) technique can and should be an efficient package.
First lie on your stomach (prone): key is to have your feet off the end of the bed. This will help keep your hips down on the bed. Next move up on to your elbows but keep your belly button on the bed surface. You should stay here for about 5 minutes or more if you have a lot of spasticity. It is a good way to get some reading done. Now move up into long sitting. Bring one knee up toward your chest and then place it so that leg is crossed over the other, with your foot just above your other knee. In this position you can do a number of stretches. First stretch the top ankle: reach to the foot and stretch into dorsiflexion (pull the foot up). This works best if you place the bottom of your foot against your forearm to push up while you are pushing down on your knee with your opposite hand. The "hug" position also stabilizes you for the stretch. Now reach for your other foot, the one on the straight leg. Reach with the same side arm by rotation of the body and chest elevation (translates to anterior pelvic tilt) this will provide a hamstring stretch at the same time you stretch the ankle. Switch legs and repeat.
In doing your range-of-motion exercises, allow time for your muscles and other structures to loosen and stretch. We recommend that you hold the position for a slow count of 10. When you are moving your body, move slowly and smoothly. Then, as you hold the position, maintain a firm but gentle pressure. Do not bounce your body, as this tends to encourage spastic muscles to tighten.
Some Important Points to Remember
- NEVER use excessive force when stretching. All that is required is enough force to allow the muscle fibers to lengthen (stretch). Excessive force can result in fractures, torn or pulled muscles, or dislocated joints.
- Hold the position still, rather than bouncing, especially if you have spasticity. This allows your muscle fibers to relax and stretch. Bouncing increases the tension in muscles.
- A good time to do your stretching program is in the morning or in the evening when you do your skin inspection.
EXERCISES FOR ASSISTED RANGE OF NOTION
The following series of range of motion exercises uses the "SAM" format, outlining the correct motions and body positioning required to perform them safely. Please remind your attendants to use careful movements and not stretch out or hurt their backs!
SAM:
S: Your STARTING position.
A: Your ATTENDANT’S action/position.
M: The actual MOVEMENT.
|
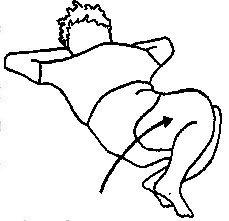
Trunk Rotation
|
S:
|
Lying on your back with your knees bent to your chest.
|
|
|
A:
|
Kneeling at your feet with both hands placed on your knees.
|
|
M:
|
Rotate your knees and hips to one side; bring them as close to the bed as they will go; keep your shoulders flat on the bed. Your attendant may need to put one hand on your opposite shoulder to hold it down.
|
Trunk Bending
|
S:
|
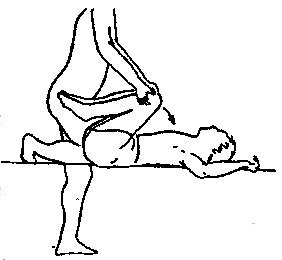
Lying on your back with your legs together and your knees bent toward your chest.
|
|
|
A:
|
Kneeling at your feet with both hands placed on your knees.
|
|
M:
|
Bend your knees to your chest, stretching your back muscles.
|
Hip Abduction with Knees Bent
|
S:
|
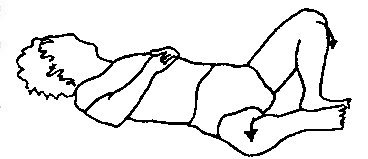
Lying on your back with your legs bent.
|
|
A:
|
Kneeling with your feet between attendant’s knees to hold them in place, each hand placed on your knee.
|
|
|
|
|
M:
|
Spread your legs apart, and down towards the bed, applying a firm (but not heavy) pressure.
|
Hip Extension
|
S:
|
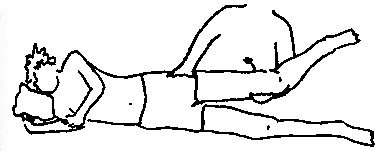
Lying on your side, not leaning forward or back, with your upper leg slightly bent.
|
|
|
|
|
A:
|
Kneeling behind you, one arm cupping under your knee with your calf resting on his or her forearm, and the other hand holding your pelvis in place.
|
|
M:
|
Pull your leg straight backwards toward your attendant.
|
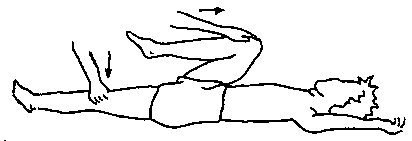
Stretches (Hip Flexion & Extension)
|
S:
|
Lying on your back with your toes pointing toward the ceiling, one knee bent toward your chest.
|
|
A:
|
One hand placed on your bent knee, the other hand placed just above the knee of your straight leg.
|
|
|
|
|
M:
|
Bend your bent leg further toward your chest, keeping your other leg straight on the bed.
|
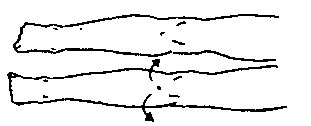
Leg Rotation
|
S:
|
Lying in bed, your legs straight and relaxed.
|
|
|
|
|
A:
|
Hands placed on top of your thigh, or one hand on top of your thigh, the other underneath your thigh.
|
|
M:
|
Roll your knee in and out. Do not have your attendant’s hands placed below your knee or there will be excessive stress to your knee.
|
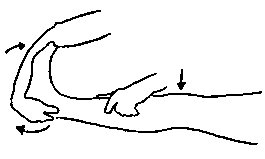
Heel Cord (Gastroc/Soleus)
|
S:
|
Lying on your back with your knees straight.
|
|
|
A:
|
One hand cups the inside of your heel, with the forearm pressed up against the ball of your foot.
|
|
M:
|
Keeping your knee straight, pull down at your heel and press up with the forearm, bending your foot toward your knee.
|
Straight Leg Raise (SLR)
|
S:
|
Lying on your back with your legs straight and slightly apart.
|
|
A:
|
Two positions possible:
- Kneeling between your legs, with one hand cupping your heel while the other hand is holding the knee of the same leg. The attendant’s knee may be resting lightly on your other thigh to stabilize your leg on the bed.
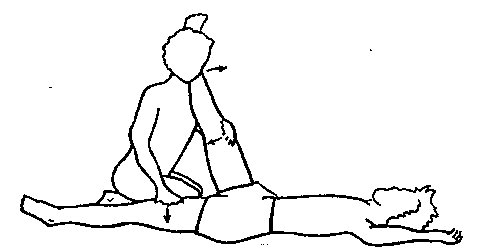
- Kneeling between your legs, with your heel cord resting on the attendant’s shoulder. One of the attendant’s hands should be placed on that knee to keep it straight, the other hand should be on your other thigh to stabilize that leg on the bed.
|
|
M:
|
Slowly raise your leg up, keeping your knee straight. Do not allow your leg to roll out. When your raised knee begins to bend slightly from the tension, have your attendant lower your leg slightly and hold. Do not move beyond the leg pointing straight up to the ceiling.
|
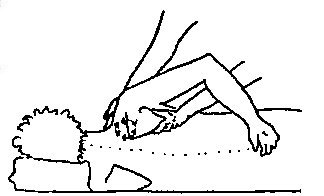
Scapular Circumduction
|
S:
|
Lying on your side with your arm resting on your hip or behind your back.
|
|
|
|
|
A:
|
One hand cupping the front of your shoulder, the other placed so the web of the thumb meets with the angle of your shoulder blade.
|
|
M:
|
Moving both hands circularly in the same direction, roll the shoulder blade slowly in a large circle.
|
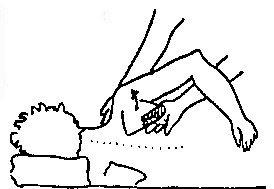
Scapular Protraction
|
S:
|
Lying on your side with your arm resting on your hip or behind your back.
|
|
|
A:
|
One hand cupping the front of your shoulder, the other placed so that the pinkie side of the attendant’s hand is next to your shoulder blade.
|
|
M:
|
Applying a firm pressure backwards on your shoulder, slide the other hand under your shoulder blade, lifting away from your back.
|
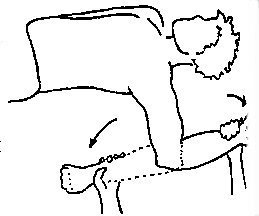
Shoulder Rotation
|
S:
|
Your arm out from your side at about 45 degrees, your elbow bent 90°.
|
|
|
A:
|
One hand cupping your elbow, the other supporting your wrist and hand.
|
|
M:
|
Rotate your hand toward the bed by your pillow, and then toward your hip. Keep your elbow bent at 90°.
|
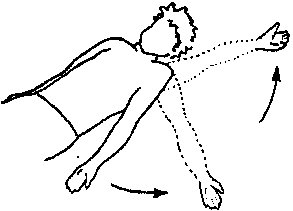
Abduction
|
S:
|
Lying on your back with your arm at your side and your palm up.
|
|
|
A:
|
One hand supporting your hand and wrist, the other cupping your elbow.
|
|
M:
|
Bring your arm out to your side up to your head (similar to the movement in jumping jacks).
|
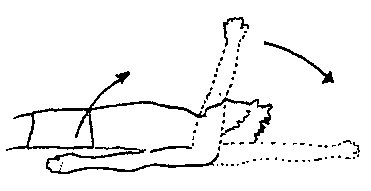
Forward Flexion
|
S:
|
Your arm at your side, palm up.
|
|
A:
|
One hand supporting your wrist/hand, the other supporting the back of your elbow.
|
|
|
|
|
M:
|
Raise your arm up over your head, with your thumb leading, pointing first at the ceiling and finally the wall. Keep the elbow relatively straight.
|
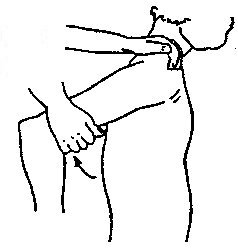
Shoulder Extension
|
S:
|
Sitting in your chair or lying on your side in bed.
|
|
|
A:
|
One hand stabilizing your shoulder, the other cupping your arm near your elbow.
|
|
M:
|
Bring your arm back behind you as if you were going to reach into your rear pocket.
|
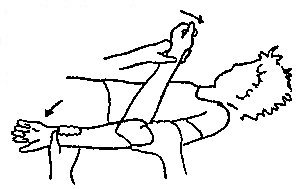
Elbow Flexion/Extension
|
S:
|
Your arm straight at your side, palm up.
|
|
A:
|
One hand supporting your wrist and hand, the other stabilizing your upper arm.
|
|
|
|
|
M:
|
Straighten your arm to its fullest, then bend your elbow, bringing your hand to your shoulder.
|
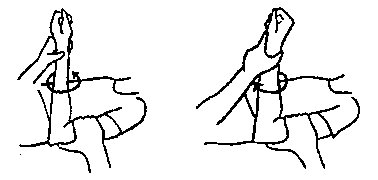
Supination/Pronation
|
S:
|
Your arm at your side with your elbow bent 90°.
|
|
A:
|
Supporting your wrist/hand and stabilizing your arm just above your elbow.
|
|
|
|
|
M:
|
Turn your palm up, then turn your palm down.
Repeat the above with your elbow straight. You can combine this exercise with the one above (Elbow Flexion/Extension).
|
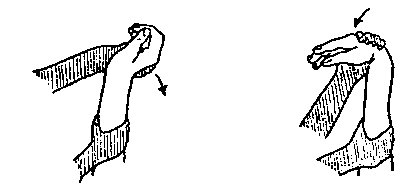
Wrist Flexion/Extension
|
S:
|
Wrist and fingers relaxed.
|
|
A:
|
One hand supporting your forearm, the other hand clasping your palm--be certain that your fingers are free to move.
|
|
|
|
|
M:
|
Bend your wrist down, allowing your fingers to straighten at will. Bend your wrist up, being certain that your attendant’s hand and fingers do not interfere with your fingers’ bending.
|
Wrist Deviation
|
S:
|
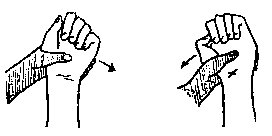
Your wrist in line with your arm, not bent up or down.
|
|
|
A:
|
Supporting your hand, the other stabilizing your forearm.
|
|
M:
|
Move your hand side to side, not allowing your wrist to bend up or down.
|
Finger Flexion
|
S:
|
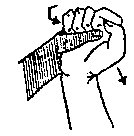
Your fingers relaxed, your wrist bent up.
|
|
|
A:
|
Supporting your hand and wrist.
|
|
M:
|
Gently bend your fingers toward your palm, being certain to keep your wrist cocked (bent) up.
|
Finger Extension
|
S:
|
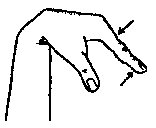
Wrist and fingers relaxed.
|
|
|
A:
|
One hand supporting your forearm and keeping your wrist bent down, the other hand cupping your finger tips.
|
|
M:
|
Keeping your wrist bent down, straighten your fingers. The movement should come from your knuckles and the joints of your fingers, not your wrist.
|
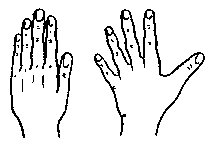
Finger Abduction
|
S:
|
Wrist straight, fingers and thumb relaxed.
|
|
|
A:
|
Holding adjacent fingers straight.
|
|
M:
|
Spread fingers apart.
|
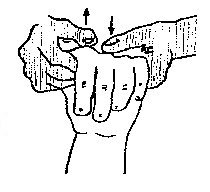
Hand Mobilization
|
S:
|
Your palm down with your thumb and fingers relaxed.
|
|
|
A:
|
Cupping your hand in both hands, the attendant’s right thumb and index finger hold one knuckle while the left thumb and index finger hold the next knuckle over.
|
|
M:
|
One hand gently pushes down on the knuckle it is holding while the other hand pushes up. Reverse directions. Move across your hand.
|
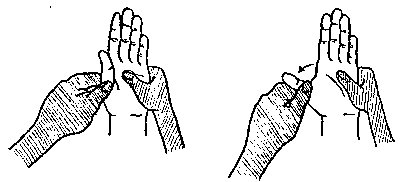
Thumb Abduction/Extension
|
S:
|
Palm up with your fingers and thumb relaxed.
|
|
A:
|
One hand stabilizing your palm, the other grasping your thumb with your attendant’s thumb at the base of your thumb.
|
|
|
|
|
M:
|
Move your thumb out and away from your palm as if you were hitch-hiking.
|
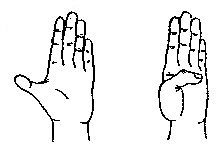
Thumb Opposition
|
S:
|
Palm up with your fingers and thumb relaxed.
|
|
|
A:
|
Holding your thumb over your nail.
|
|
M:
|
Touch the tip of your thumb to the base of your little finger.
|
|


